Difference between revisions of "Main Page"
(→Electronics) |
(→Electronics) |
||
| (One intermediate revision by the same user not shown) | |||
| Line 24: | Line 24: | ||
** [https://www.adafruit.com/product/239 breadboarding PCB] | ** [https://www.adafruit.com/product/239 breadboarding PCB] | ||
** [https://www.adafruit.com/product/723 prototyping PCB] | ** [https://www.adafruit.com/product/723 prototyping PCB] | ||
| − | ** | + | ** 4 x 20 pin header rows |
** breadboarding cables | ** breadboarding cables | ||
** on/off slide switch | ** on/off slide switch | ||
** [https://www.adafruit.com/product/4203 LEDs] and 330 Ohm resistors | ** [https://www.adafruit.com/product/4203 LEDs] and 330 Ohm resistors | ||
** [https://www.adafruit.com/product/367 button switches] | ** [https://www.adafruit.com/product/367 button switches] | ||
| − | ** a [https://www.adafruit.com/product/160 buzzer] which works well around 4 kHz (C<sub>8</sub> = 4186 Hz) | + | ** ''a [https://www.adafruit.com/product/160 buzzer] which works well around 4 kHz (C<sub>8</sub> = 4186 Hz)'' |
* a power supply: | * a power supply: | ||
| − | ** a [https://www.adafruit.com/product/2011 battery] | + | ** ''a [https://www.adafruit.com/product/2011 battery]'' |
** a [https://www.adafruit.com/product/1904 battery charger] | ** a [https://www.adafruit.com/product/1904 battery charger] | ||
** a [https://www.diodes.com/assets/Datasheets/ZVP4424A.pdf p-channel MOSFET] | ** a [https://www.diodes.com/assets/Datasheets/ZVP4424A.pdf p-channel MOSFET] | ||
| + | |||
| + | Buzzer and battery are not provided as they have to be dimensioned and chosen by the users. | ||
The developers should have access to: | The developers should have access to: | ||
Latest revision as of 11:54, 10 February 2022
This wiki presents a possible setup for the Swiss CanSat competition.
Contents
Development
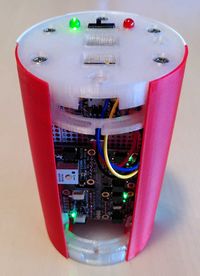
The work consists to build a system in the shape of a soda can which will be launched at about 1 km altitude. As a primary mission, the CanSat will log temperature and pressure during the whole flight. Additionally, a secondary mission is defined by each competition group.
Additionally to the system engineering, the work comprises the development of:
- the control and data acquisition electronics
- the power supply
- the enclosure
- the parachute
Electronics
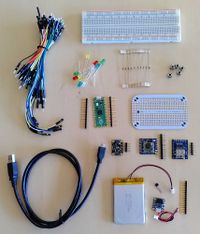
The CanSat electronics bases on a kit comprising:
- a Raspberry Pi pico control board
- a temperature, humidity and pressure sensor
- a Printed Circuit Board (PCB) development set:
- breadboarding PCB
- prototyping PCB
- 4 x 20 pin header rows
- breadboarding cables
- on/off slide switch
- LEDs and 330 Ohm resistors
- button switches
- a buzzer which works well around 4 kHz (C8 = 4186 Hz)
- a power supply:
Buzzer and battery are not provided as they have to be dimensioned and chosen by the users.
The developers should have access to:
- a welding station
- micro-USB cables
- tools (screwdrivers, pliers, ...)
Software
If using the Raspberry Pi pico, the developers should install:
Housing
The system must fit inside a cylindrical enclosure of 115 mm height and 66 mm diameter.
The mass of the CanSat is limited to 350 grams.
The antennas, transducers and other devices of the CanSat cannot oversize the can diameter until it leaves the launching system. The deployable subsystems and recovery system can exceed the length of the primary structure, up to a maximum length of 230 mm.
The Swiss Kit housing weighs about 100 g. It comprises:
- a botton plate and a top plate
- 6 walls
- 12 M3 bolts and screws
Getting started
Obviously, the first step is to go through the specifications.
Next, the structure of the team has to be defined. It is of usual practice to have one responsible team member who knows what each group (electronics, mechanics, ...) is doing and what information he has to share between the groups.
Electronics
Some of the boards are programmed using MicroPython. Adafruit maintains a variant called circuitPython. A common development IDE is Mu Editor which works on different operating systems, including linux and Windows.
Start by;
- installing Mu Editor
- installing CircuitPython on the Raspberry Pi Pico
- trying out some simple examples, all the way to blinking the Pico board's LED
Enclosure
The enclosure will have to withstand a landing. A first model can be built and tested to fall on grass and then on concrete. Obviously, this first enclosure has to be filled with ballast in order to weigh about 300 g.
Parachute
The parachute design can also start from the first day.
Links
Kits :
presentations:

